I referred to the posts of other students, such as those who hate my brother
https://a.xcar.com.cn/bbs/thread-96946401-0.html? xuid=15091684
The adhesive strip arrived today and will be replaced as soon as possible. Please forgive me for patients with OCD
During this period, the top of the first installation was not aligned, so it was disassembled and reinstalled again.

The only tool: the pry blade, which I asked for from the boss

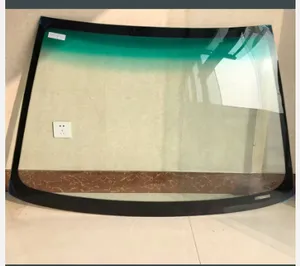
The old glue strip, 6 or 7 years old, is terrible. There is a big pit directly under it, which will break when touched. I am speechless

The operating instructions sent by the boss are that you must start from position 1. After the bottom is pried open, everything above will be easy.

There are only 4 buckle positions for the 15 models, and there are no other fasteners. The holes on the adhesive strip are directly connected to these 4 buckles.
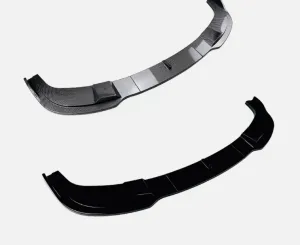
The sequins and adhesive strips are integrated and need to be removed as a whole

Remove and replace

Separate the sequins and adhesive strips, and separate the pry blade from the middle

Just stick it in and pry open it.

On the other side, remove it in the same way

Align the newly replaced adhesive strip with the sequins and press it in hard. If some positions are not easy to press, just press it hard, or stick a pry blade in to help press it

Have the officials noticed the problem? When it was installed for the first time, the top was not stuffed into the skylight. A large hole was exposed and a detour was taken

After that, push the sequins up hard, so that they can just stick to the hole above

The same problem in the driver’s seat

After the sequins were pulled up, the panties were exposed. How could this be acceptable?

You can only pry open it again, align the top of the bright strip with the empty space above, insert it in, and then use force to pat the bright strip/adhesive tape down

Now I feel comfortable, my inner body is not exposed

The upper holes are aligned
finally completed
Although there are job stickers and the boss’s schematic drawings, the first demolition still takes a lot of time and energy, but it is actually not so difficult after understanding it. The second demolition will be very fast, and if you are skilled, it will be completed in 20 minutes.
Thank you all for watching: )
Also attached is a photo behind the dull atmosphere lights of the original car. In fact, the improvement is not obvious. It cannot be compared with the atmosphere lights of the new Mercedes-Benz E-Class or even domestic cars. I suggest you not waste this money. Those who pursue this should still change the car honestly. Thank you


 April 1, 2024